| Assigned: | TBA |
| Due: | TBA |
Reference text and tutorials:
- Reading:
- Review "Three-Point Lighting" (Digital Lighting & Rendering by Jeremy Birn)
- Review Types of Lights in Maya
- Review Ch. 14 from Maya 6 for Windows and Macintosh: Visual QuickStart Guide by Danny Riddell
- Tutorial
- Review Three-Point Lighting
Tools/techniques:
- Types of lights in Maya
- Spot lights
- Directional lights
- Point lights
- Area lights
- Volume lights
- Ambient lights
- Three-point lighting
- Key light - The strongest, main source of light that defines the shape and surface of the subject matter.
- Fill light - Soft source of light, used to bring up the shadow area created from the key light.
- Back/Rim/Kicker light - Placed behind the object from the camera's perspective, brings out the object from the background, adding a separate layer for the object.
- Bounce light - Reflects up from the floor or other surfaces. Fills in dark areas on the undersides of the character.
- Shadows
- Light-linking
- IPR Rendering
Turn-In:
- Please turn in your Maya .ma or .mb file of your lit orange, as well as a final render of your scene with all lights on.
- Be sure to name your files: "lastname_firstname_projectname".mb or .ma, "lastname_firstname_projectname".jpg
- In this assignment, you will be doing character lighting on a simple object -- an orange -- in order to familiarize yourself with character lighting concepts.
- After spending considerable time learning the lighting tools and types available to you, please remember that good lighting is an art, not a science...
- I'm not looking for a perfect physical replica of the "real" world. I'm looking for believable lighting that presents your character and set in a well composed environment -- all in support of your compelling story.
- Experience with the software tools, and the development of a critical eye is essential for those who wish to produce exciting CG lighting environments. You will be painting with light. Be sure to apply all of your experience with other art forms to this exercise.
What to do:
- Download orange_no_lights.mb and orange_3lights.mb
- Refer to the orange with lights image. The goal of this project is to recreate the lighting in the image as accurately and precisely as possible. It will require a critical eye to determine exactly what types of lights to use, where to place them, how to color them, and what sorts of settings to use to achieve the proper effect.
- As you work to match the provided image, note that you will be able to get reasonably close reasonably quickly, but to get a really perfect replica should take you several days.
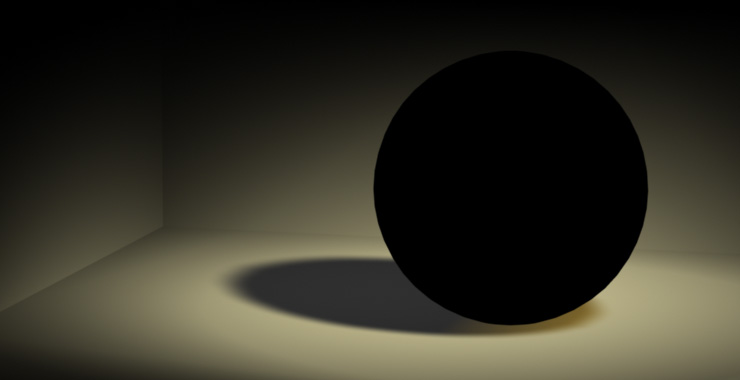
- To get a better sense of how the lighting is broken down, refer to the following images which show the contribution from each light:
All lights
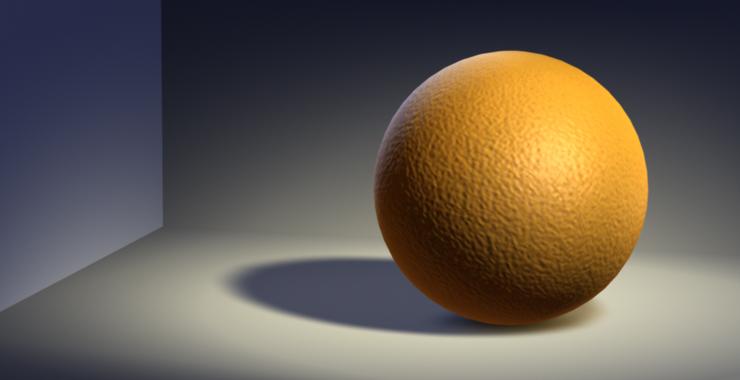


Specular light = makes the orange have a shiny reflection
Contact shadow light = makes the contact shadow at the base of the orange


All lights
Fill light (bottom) = fills up darker areas
Bounce light = light contribution from the ground


Key light = main light illuminating the orange
Fill light (left) = fills up darker areas
Kicker (right) = similar to key, make edges stand out
Kicker (right) = similar to key, make edges stand out


Rim light = used to cut out the edge of the orange
Kicker (top) = similar to key, make edges stand out
Background Key = main light on the background
Background fill = fills up darker areas
- Do NOT change the camera or any of the geometry in the scene; work only with the lighting. Additionally, you should not have to change any of the Render Globals.
- As a general rule, be cautious when using "flashy" lighting techniques such as fog and lens flares. While these tools can be useful, they are overused and often distracting. Use them sparingly and subtly.
- You can't light effectively without using the IPR render. Load the image you are trying to match in the render window so you can toggle back and forth and see how close your renders are to the target. Ask if you need help with this.
- I am looking for perfection. Don't stop too soon.
- DON'T FORGET CONTACT SHADOWS!!!